


How to Measure Your Bra Size at Home, From a Real Fitter
By Natalie, Senior Fitter at Journelle Upper East Side. Certified bra fitter, 12 years on the sales floor, thousands of fittings across brands from Chantelle to Elomi.
Most of the people who come in for a first fitting have already measured themselves at home at least once. They've watched a video, wrapped a tape around their ribs, done the subtraction, and arrived at a size that didn't quite work. The tape isn't lying on purpose — it's just that a bra size you can actually wear isn't really a measurement. It's a measurement, plus fit testing, plus knowing which brands run narrow or deep or generous.
This guide walks through the three measuring steps exactly the way we do them on the fitting-room floor, then gives you the five things the tape most often gets wrong and how to spot them. By the end, you should land inside two or three sizes that are worth trying on — which is almost always where the right bra lives.
Before you start: what you'll need
- A soft fabric tape measure. Metal or stiff tapes don't wrap evenly around curves and will read tight.
- A mirror. The tape has to sit level all the way around. You'll catch a tilt in seconds that you can't feel.
- Your best-fitting unpadded bra, or no bra at all. A padded or push-up bra adds volume that will throw the bust measurement by a full cup or more. If the only bra you own is padded, measure bare and we'll adjust in step 3.
- Two minutes. Hurrying is the single biggest cause of a bad measurement.
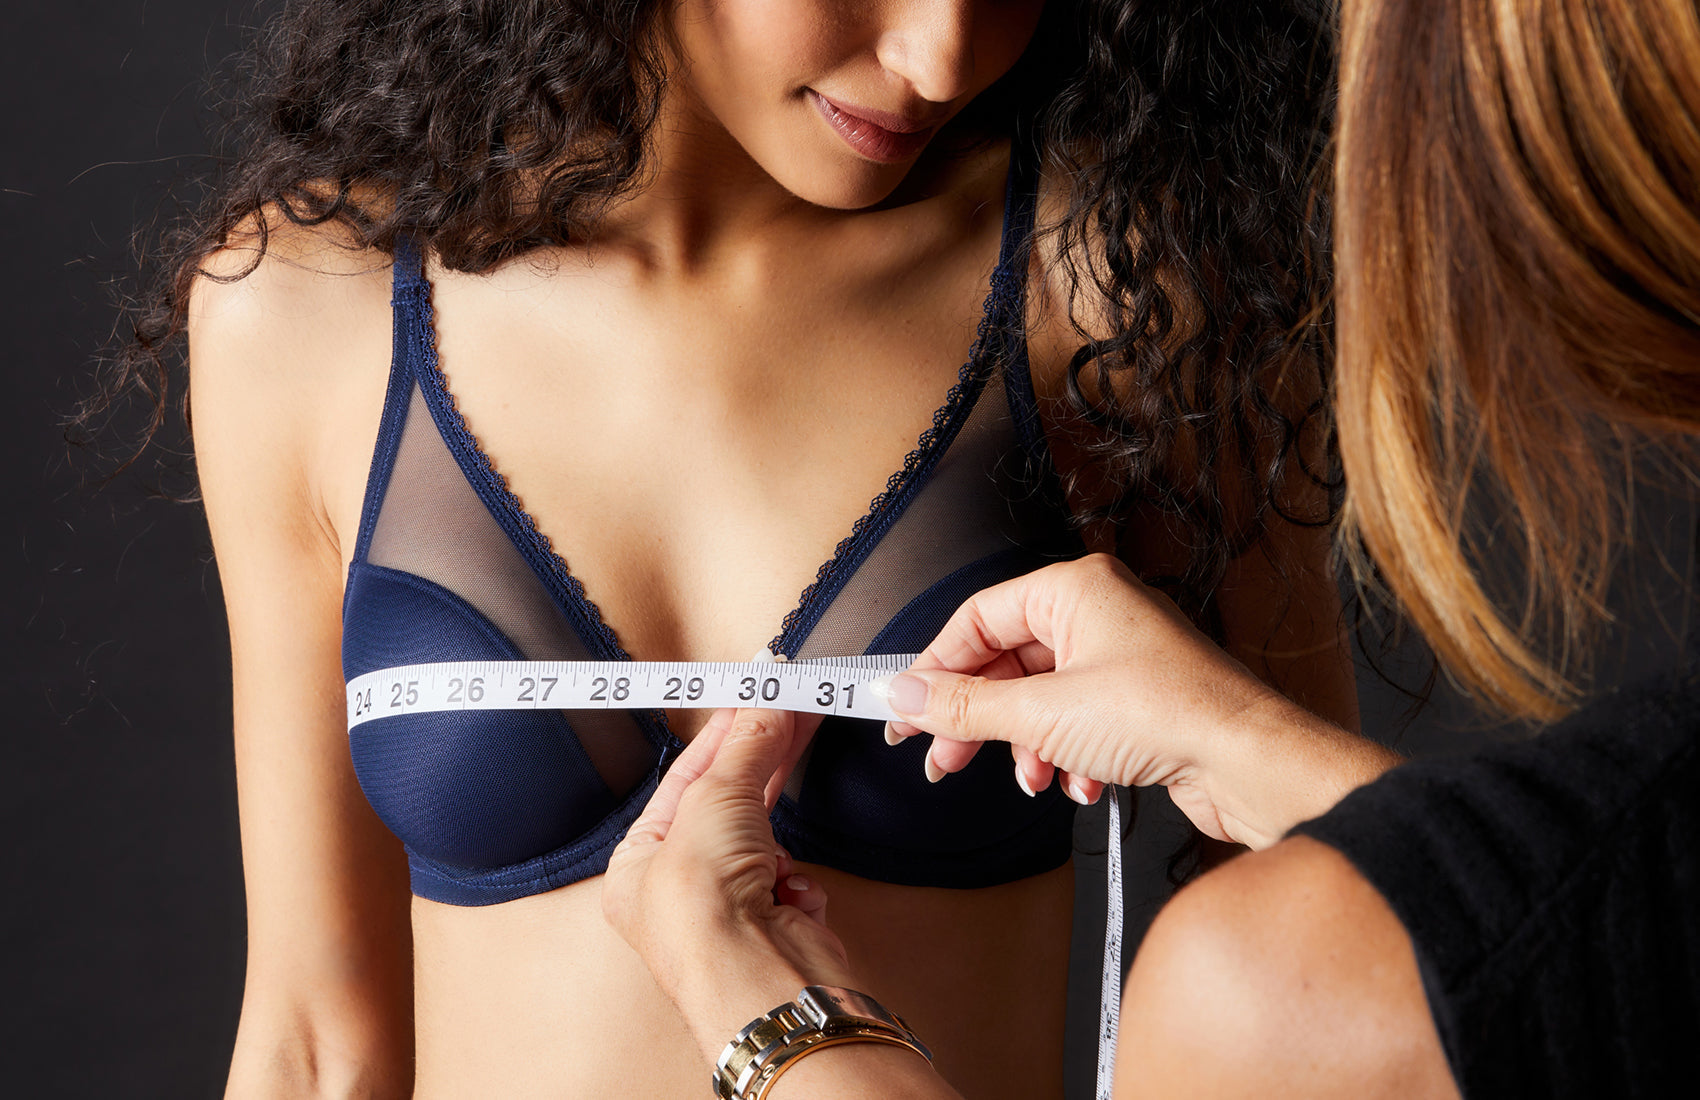
Step 1: Measure your band
The band does around 80% of the work of holding a bra up. Get this number right and the cup conversation gets much easier.
- Wrap the tape directly under your bust, where the underwire of a bra would sit — not across the stomach, not at the bottom of the ribcage, but right at the crease under the breast tissue.
- Pull the tape firm. This is the step that throws most people. A bra band is meant to feel snug against the body; if you leave slack in the tape, you'll end up in a band size that rides up at the back all day.
- Check the mirror. The tape should sit parallel to the floor all the way around. A dip at the back is the most common cause of an inflated band number.
- Round to the nearest whole inch.
That number is your band measurement. In US sizing, the band measurement is your band size — so a 34-inch band measurement means you're starting with a 34 band. (UK and European sizing use a different formula; we'll come back to that.)
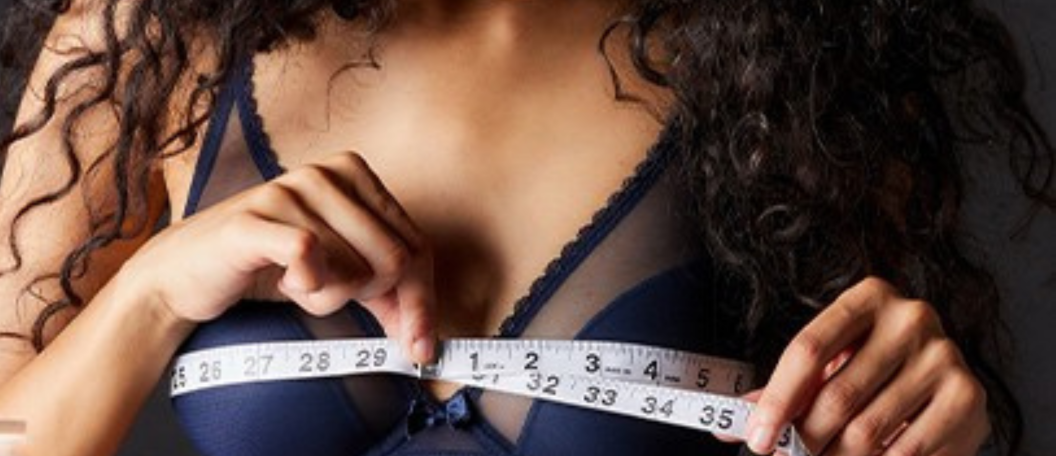
Step 2: Measure your bust
- Lean forward roughly 45 degrees so the bust settles away from the chest wall. This is how we check volume in a fitting — it gives a truer reading than measuring upright.
- Wrap the tape around the fullest part of the bust. For most people that's across the nipple line, but for longer or softer shapes it may be slightly higher.
- Let the tape sit gently — not loose, but never digging in. The goal is to measure the tissue, not compress it.
- Read the number, stand back up, and round to the nearest whole inch.
Step 3: Calculate cup size
Subtract your band measurement (step 1) from your bust measurement (step 2). Each inch of difference equals one cup size, on the standard US scale:
- 1 inch = A
- 2 inches = B
- 3 inches = C
- 4 inches = D
- 5 inches = DD (or E in UK/EU)
- 6 inches = DDD / F (UK F)
- 7 inches = G (UK G)
- 8 inches = H (UK H)
So a 34-inch band with a 38-inch bust measurement lands at 34D. That's a starting point — not a verdict. The next section is why.
Five times the tape lies (and how to spot it)
The most useful thing we can tell a client measuring at home is that the tape alone is frequently wrong, and here's why. If any of these apply to you, treat your calculated size as one option in a shortlist rather than the answer.
1. Your band measurement rounded up to an even number
US sizing uses even-numbered bands (32, 34, 36, 38). If your underbust measures 33 inches, one guide says round up to 34; another says add 4 inches and round. Both answers are often too loose. Our rule: if you measure between sizes and your current bra rides up at the back, size down, not up. The band should feel firm the moment you fasten it.
2. You measured in a padded bra
Every layer of padding is tissue your bust measurement adds back into the cup calculation. A lightly lined bra adds roughly half a cup. A push-up can add a full cup or more. If you measured in a padded bra and your calculated size feels off, try a cup smaller.
3. Your breasts are shaped differently from the tape's assumption
The bust calculation assumes a roughly even distribution of tissue around the chest. In practice, bust shape varies: some people carry more tissue toward the underarm, some sit lower and wider, some sit full-on-top, some full-on-bottom. Clients who are "full on bottom" often measure into what looks like a B cup but actually need a full C or D cup to accommodate their shape.
4. Your back is broader or narrower than your underbust
A narrow underbust with broad shoulders often needs a band size up for strap comfort, not down. A broad underbust with narrow shoulders can get away with a tighter band. The tape reads underbust, not the whole torso — which is one of the things a fitter's eye adjusts for automatically.
5. You have asymmetry between breasts
Most people do, to some degree. If one side is noticeably larger than the other, fit to the larger side and add a removable insert on the smaller side. Sizing down and squeezing the larger breast is the most common fit mistake we un-do at the counter.
How to test your calculated size when a bra arrives
Once you've got a shortlist of sizes, the try-on is the actual fit test. A few things to check:
- Band: Fasten on the loosest hook. A new bra should feel snug there because the elastic will relax over three to six months of wear, and you'll move to tighter hooks as it ages. If it already fastens firmly on the middle hook, size the band down next time.
- Centre gore: The fabric panel between the cups should sit flat against your sternum. If it's lifted away (called "tenting"), the cups are too small — go up a cup, not down a band.
- Cups: Should hold the breast fully with no wrinkles in the fabric and no bulging over the top or sides. Wrinkles mean the cup is too big for your tissue volume. Bulging means too small.
- Straps: Should be firm enough to stay put without digging in. You should be able to fit two fingers under a strap with very light resistance. If the straps are the main thing holding the bra up, the band size is wrong.
- Underwire: Should sit flat against the ribcage, encircling the entire breast. If the wire is poking into breast tissue, the cup is too narrow — and you may need a different brand, not just a different size, because wire widths vary between makers.
How bra size changes over time
The other reason home measuring gets a bad reputation is that people measure once and assume the number is permanent. It isn't. Bra size changes with:
- Weight fluctuation. A gain or loss of 10 pounds will often shift band and cup together.
- Hormonal cycle. Many people are half a cup larger in the week before their period. If you always measure in the same cycle phase, you'll get a consistent read.
- Pregnancy and postpartum. Band size often goes up mid-pregnancy and cup size increases substantially through the last trimester and into nursing. Most people don't return to their pre-pregnancy size; plan to re-measure at six weeks postpartum and again at six months.
- Perimenopause and menopause. Tissue composition changes; many clients find their cup size increases even as overall weight stays the same.
- Strength training. Building the muscle under the bust (pectoralis, serratus) can increase band size without changing cup.
A useful rule of thumb: re-measure every 6-12 months, or any time a bra that used to fit starts not to.
When to stop measuring and book a fitting
The tape is a good starting point for most people. It's less reliable if any of the following describe you, and in those cases a professional fitting saves a lot of time and returns:
- You're DD or above — cup variation between brands and styles gets bigger at larger sizes, and fit is less forgiving. Our DD+ edit is curated specifically for this.
- You've tried three or more bras in your calculated size and none of them worked — usually a sign of a shape mismatch rather than a number mismatch.
- You're pregnant, postpartum, or recently had breast surgery, including mastectomy or reduction.
- You haven't had a fitting in five or more years.
We book in-store and virtual fittings for free — no purchase expectation, and the session itself is usually 20-30 minutes. If you'd rather keep going at home, our bra fit guide walks through the measuring steps above with diagrams.
What to do with your size once you've got it
Start with one well-fitting everyday bra before you invest in anything more. A T-shirt bra in your correct size, fitted correctly, is the single best investment you can make in the drawer. Once that's right, everything else — bralettes, plunge styles, occasion sets — fits more reliably on top of it. The full bra edit filters by size, cup style, and support level, and it's the fastest way to see what's actually stocked in your size today.
If you're new to the category and want the broader lay of the land — what silhouettes exist, what each one is for, which pieces belong in a starter drawer — our Lingerie 101 guide covers it in order of priority.
Frequently asked questions
How do I measure my bra size without a measuring tape?
A length of string and a ruler works in a pinch. Wrap the string where the tape would go, mark the overlap with your finger, then measure the length against the ruler. The result is slightly less precise than a proper tape, so treat the calculated size as a ballpark only.
Why does my calculated bra size not fit?
The most common reasons: you measured in a padded bra (cup comes out too big), your band measurement was taken loose (band comes out too big), or your breast shape is fuller or softer than the calculation assumes (cup comes out too small). Work through the "five times the tape lies" section above; if none of those resolve it, book a fitting.
How often should I re-measure my bra size?
Every 6-12 months, or any time a bra that used to fit starts not to. Significant events — weight change, pregnancy, postpartum, menopause, surgery — warrant a re-measure sooner.
Is it better to measure yourself or get a professional bra fitting?
Home measuring works well for A-D cup sizes and gives you a solid starting point at any size. At DD and above, or if you're between bands, or if you've tried the calculated size and it doesn't work, a professional fitting is faster and more accurate — the fitter is reading shape and projection, not just circumference.
Do bra size measurements differ between brands?
Yes, and significantly. UK brands (Panache, Freya) run slightly narrower in the wire and often fit a cup size smaller than US brands. French brands (Chantelle, Simone Perele, Aubade) tend to run long in the band and small in the cup. US brands (Natori, Cosabella) sit in the middle. Don't assume a 34D in one brand is a 34D in another — our fitters talk clients through brand-specific sizing as part of any fitting.
Ready to verify your size with a fitter? Book a free in-store or virtual fitting here. Or start browsing the full bra edit in your calculated size.